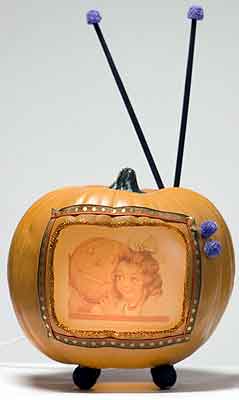
Like all other obsessive crafters, every year I hurt my brain trying to come up with some new and fantastic idea, only to see a better version in a glossy magazine. I don’t think that will happen today. Maybe it’s because of my addiction to the new fall TV season, but I’ve had nothing but screens on my mind. I think that’s how this Pumpkin TV idea creeped into my imagination. The concept is to take any picture and transform your pumpkin into a lighted prop. To go the extra inch – bake a batch of rectangular cookies, use orange, brown and white icing and decorate them like TV remotes. Now that’s what I call Must See TV!
Foam Pumpkin TV Set
Supplies:
1 medium foam pumpkin
1 heavy-duty craft knife
1 quarter of a piece of paper, pen, scissors
1 image printed on a sheet of vellum paper
Orange micro glitter, orange paint
Polka dot ribbon
Glue dots and hot glue gun
Plug-in pumpkin light (found at the craft store)
4 wood doll heads
2 chopsticks
4 purple spice drops
Directions: Using the scissors, round off the corners of the piece of paper to create the pattern for the “screen”. Draw two shapes on the pumpkin where you will need to cut. Find the flattest side of the pumpkin, then lay the pattern down and trace around it. Turn it face down and draw a circle big enough to fit the light through. Using the craft knife or Dremel tool, cut out the two shapes.
Using your finger, apply a thin layer of orange paint around the inner edge of the screen, to cover the bumpy cut marks. Sprinkle the orange glitter over the wet paint. Let dry. Take the pumpkin piece that you cut out to make the screen. Lay your image over it and cut off the edges, leaving a 1/4-inch border. Apply glue dots around that border on the front side of the image. Feed the image through the hole you cut at the back of the pumpkin and carefully press the picture in place so it is centered and the image shows through. Use a hot glue to tack down any open spots and to add a border of ribbon around the screen. Turn the pumpkin upside down and glue on the wood doll heads for the “feet” of the TV. Turn the pumpkin right side up again, trim the chopsticks and poke them through the top of the pumpkin to look like antennas. Glue a purple spice drop on each one and also for the knobs at the side of the screen. Feed the light through the hole and glue in place if needed. Plug in and use!
Variations and tips: Only use a foam pumpkin for this project for safety reasons. Use family photos from past Halloween events for the image. Use white striped or speckled vellum paper to make it look like a real TV screen. For best results, insert the light from the back of the pumpkin, instead of inside the pumpkin. You can also cut several “windows” in the pumpkin and apply multiple pictures.
***
Author of Crafty Chica’s Art de la Soul: Glittery Ideas to Liven Up Your Life ($19.95, Rayo Books, an imprint of Harper Collins).


This is soooo cute I can’t stand it!!! More folks should make(or carve) pumpkin TV’s!!!!!