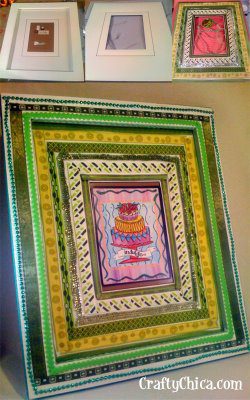
How to make ribbon-trimmed frame – this is an excellent way to use up excess ribbons and trims!
Each deck is comprised of paintings that Patrick and I made. Each card is double sided and comes with an artful affirmation on the back!
Show me a blank frame and I’ll show you a good time craft project. I recently came across some large matted frames on clearance at the store. I brought them home and showed them the love with a little help from my ribbon basket. This idea serves two purposes: it will clear your stash to make room for new trims, and it will add a textured look to your home decor. You can use the same technique on wood blocks, boxes, pillars and any other large smooth surface.
I used the “indulge” card to remind myself that it is A-OK to dive in every so often!
Supplies:
1 11×14” frame with a flat base and 5×7” mat
Assorted trims and ribbons, at least 1 yard of each
Aleene’s Original Tacky Glue
Scissors
Directions: Separate the frame, setting aside the backing and glass. Take the mat and using flat ribbons, lay them down in various patterns until you like what you see. Start from the center and work your way out. Work one side at a time, and add a thin line of glue. Set the ribbon down on the glue, and run your fingers over it so it lays flat. Continue adding the ribbon and trims all around the mat. Add ribbon around the outer border as well. Set aside to dry. Repeat the process for the outer frame. Let dry and then add your picture and reassemble the frame.