Half of the fun of gardening is in finding creative ways to display the goods. These days, ordinary terra cotta planters don’t cut it. While some people prefer to make over the planters with paint or mosaics, others are content with keeping their traditional look.
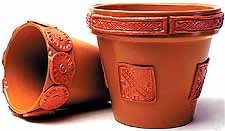
Enter air-dry clay! It’s easy to use, dries fast and adds a whole new, subtle dimension to terra cotta planters and accessories. Other uses include making ornaments, covering picture frames, boxes, candleholders and more.
Materials:
* 1 package air-dry clay
* Cardboard for work surface
* Small rolling pin
* Small cookie cutters
* Decorative stamps
* Craft knife
* Toothpick or ball-point pen
* Rubber clay molds
* Permanent glue
* Terra cotta planter pots
* Gloss varnish
* Brush
Directions:
Pinch off a small lump of clay and roll it into a ball; keep the remainder of the clay tightly sealed in its package to prevent drying out. Flatten the ball with your fingers, place it on your work surface, and smooth and flatten with the roller.
Punch out shapes with the cutters, then press a rubber stamp firmly in the center to create an indentation. If using a large stamp, skip the cookie-cutter step and press stamp directly onto clay, then cut around the stamped shape with the craft knife. Use a toothpick or ballpoint pen to press designs and dots into the clay.
If you prefer to use a mold, pinch off a small piece of clay, roll into a smooth ball and press firmly into the mold. Press the opposite side of the mold so the piece will pop out.
To apply to the pot, spread a thin layer of permanent adhesive on the back of the clay surface. Gently apply it to the pot and hold in place. Hold the two pieces until they are secure. After you’ve applied all of the pieces, let the pot dry for several hours. Brush on a layer of gloss varnish, let dry and add a second coat.

OMG, you just gave me the idea for the pillar candle holder for my daughter’s wedding. I have a glass flowerpot with a dish underneath at home. All I need to do is add some of the same sticky rhinestones that are on the candle to the flowerpot!
I’ve been complaining how much all the premade stuff at the wedding stores is. We decorated the candles for the candle lighting thing with “crystals”, I bought taper holders at the dollar store, and now it’s complete! Now just 999 more things to do…