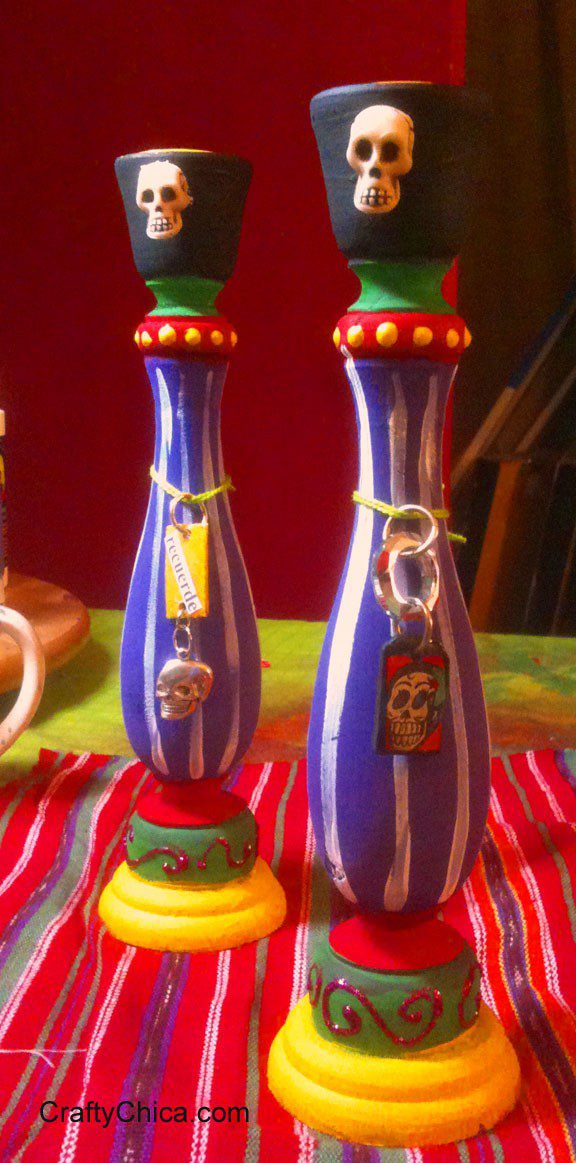
Look at local thrift shop for wood candle sticks, or you can buy some ready to go and add accents and embellishments.
Supplies:

Craft paint
Sandpaper (fine and medium grit)
Mod Podge
Extra-strength craft glue
Glitter embroidery thread and charms
Skull beads
RELATED:
Easy DIY: Dia de Los Muertos marigold flower crown
Directions:
Prepare the Candlesticks
Sand the Surface:
Begin by sanding the candlesticks with medium-grit sandpaper to smooth out any rough areas and remove imperfections. Follow up with fine-grit sandpaper to create a smooth surface. This step is crucial for achieving a professional finish.
– **Clean the Surface:** Wipe down the candlesticks with a tack cloth or a slightly damp rag to remove all the sanding dust. Ensure the wood is completely dry before proceeding to the next step.
Paint the Candlesticks
Once the primer is dry, apply the first coat of paint. If you’re using acrylic paint, use a brush suitable for the size of your candlesticks and the detail work involved. For spray paint, apply in a well-ventilated area, using even strokes to cover the surface. Allow the first coat to dry completely.
For a more vibrant color or to ensure even coverage, apply additional coats as needed, allowing each coat to dry thoroughly before applying the next.
Add Details or Patterns
Paint an accent design with a liner brush and Mod Podge and add glitter. Tap to remove excess glitter, let dry.If desired, use painter’s tape to create patterns or designs on your candlesticks. Paint over these areas with a contrasting color, and remove the tape while the paint is still slightly wet to ensure clean lines.
Apply a Protective Sealer
After the final coat of paint has dried, consider applying a clear protective sealer to protect the paint from chipping and to make your candlesticks more durable. This step is particularly recommended if the candlesticks will be handled frequently or placed in high-traffic areas.
Tie charms on with thread.
Use adhesive to affix skull beads to top of candlesticks.
Remember to work in a well-ventilated area throughout the project!
Thanks for checking out my post about Dia de los Muertos painted wood candlesticks.