Here is how to make a picture bracelet – from items you wouldn’t normally think about for crafting!

Make a picture bracelet from washers
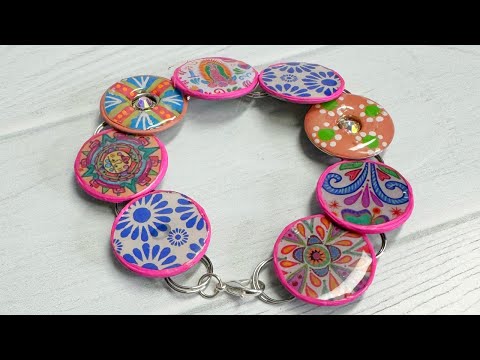
This picture bracelet comes from one of my early craft books that I wrote for tweens, back in 2005! What I love about it is it is so easy to make from items you probably already have. And if not, I have links where you can buy them.
I used scrap paper, but you can also use fabric, wrapping paper, ephemera, or anything else that you think would make a bracelet to show off.
If you plan to use family photos, make sure to make color copies, never use the originals!
Resin makes it all come together and look very polished. However, if you are making this with kids, feel free to use something like Mod Podge. Either way the bracelet will come out 100% unique to you!
Video of how to make a picture bracelet
Supplies to make a picture bracelet
– Bola tie slides (to hold the washers together)
– Printed pictures or images (preferably coated)
– UV resin and UV lamp for curing
– White craft glue
– Extra strength craft glue, like E6000
– Scissors
– Disposable gloves (for handling resin)
– Sandpaper (optional, to smooth washer edges)
– Jewelry clasp and jump rings (for the bracelet closure)
Directions to make a picture bracelet
Make sure the washers are clean and free from oil or dirt.

Choose your pictures. If you use glossy photo paper, you won’t need to seal. But if your paper is uncoated, you’ll need to add a sealer. Stay tuned for that step…

Apply a thin layer of white craft glue to the top of the washer.

Carefully place the picture on the washer. Smooth out any bubbles or wrinkles.
Prepare your workspace for resin application. Work in a well-ventilated area and wear disposable gloves.
Prep the UV resin according to the manufacturer’s instructions.

Apply a thin layer of resin over the picture and washer. Ensure the resin covers the picture entirely and goes slightly over the edge of the washer to form a small dome.
Use a toothpick or a small tool to pop any bubbles that form in the resin.
Cure the resin under a UV lamp or in direct sunlight as per the resin instructions (usually about 2-15 minutes, depending on the resin brand and UV strength).
Assemble the Bracelet
Once the resin is cured and hard, you can assemble the bracelet!
Turn the bracelet pieces back side up. Add E6000 to the washer, then the bola tie slide. Let dry for a couple hours.

Link the washers together using the jump rings. Press the edges of the bola tie slide down so the jump ring cannot slip off.
Add a jewelry clasp and jump rings at the ends of the bracelet for easy wearing.

Check all connections to ensure they are secure.
Adjust the fit by adding or removing washers as needed.

Here is my finished bracelet!

RELATED:
How to make uv resin keychains – w/ GLITTER!