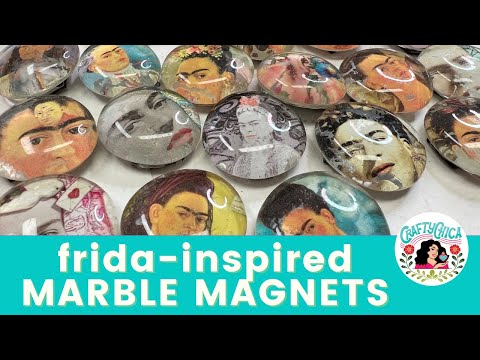
Looking to add a touch of artistry to your fridge? Look no further than these DIY Frida Kahlo marble magnets!

When we think of Frida Kahlo, the first thing that comes to mind is usually her vibrant, profound paintings. Yet, her love for art went beyond the canvas. I know because I authored a book all about Frida!
After deep diving into all things about her life, I was so happy to report she loved to craft. That’s where I really connect with her – she was a hyper creative too! From embroidery to ceramic painting, flower arranging, mixed media, even puppet making. Where her paintings served as putting her mark on the world (painting her reality), her crafts were daily dots of joy and random creativity. She didn’t save all that energy for her canvases. Inspiration seemed to pour out of her in all she did. From her outfits to her kitchen set-up.
Frida was an avid craftswoman who enjoyed creating beautiful, everyday objects that reflected her colorful personality and rich Mexican heritage. She loved to decorate her home for every season. She literally color-coordinated the florals with the beverages and the meals and the plates.
On that note – let’s make a cool and easy Frida Kahlo-themed DIY craft project that is not only fun to make but also pays tribute to her enduring legacy.
Crafty Chica’s Frida-inspired marble magnets video
Let’s channel our inner Frida and get crafting!
Materials needed for DIY Frida Kahlo marble magnets

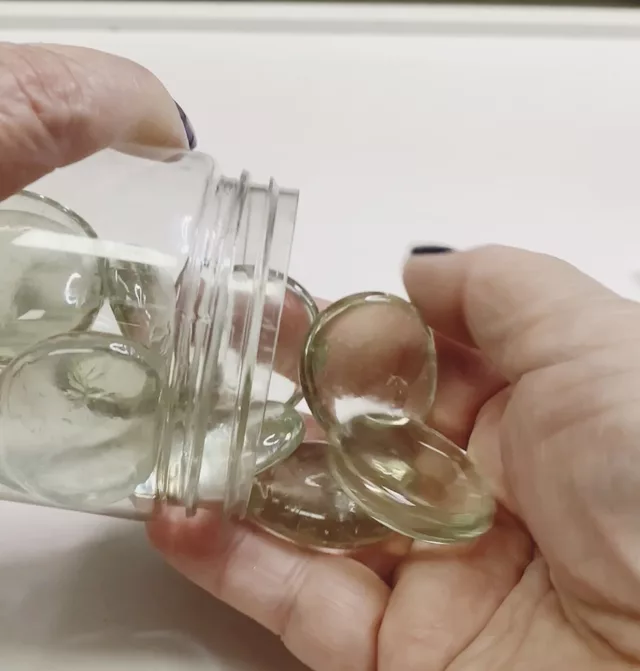
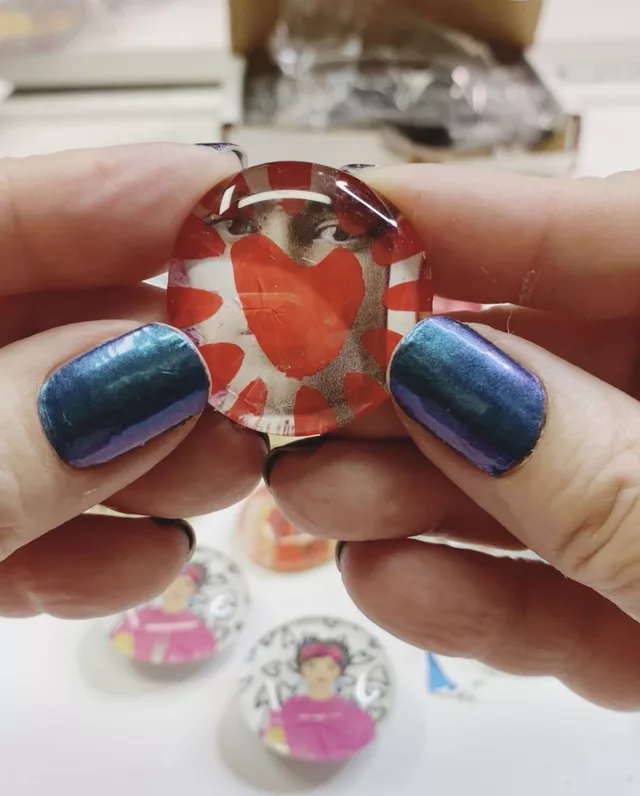
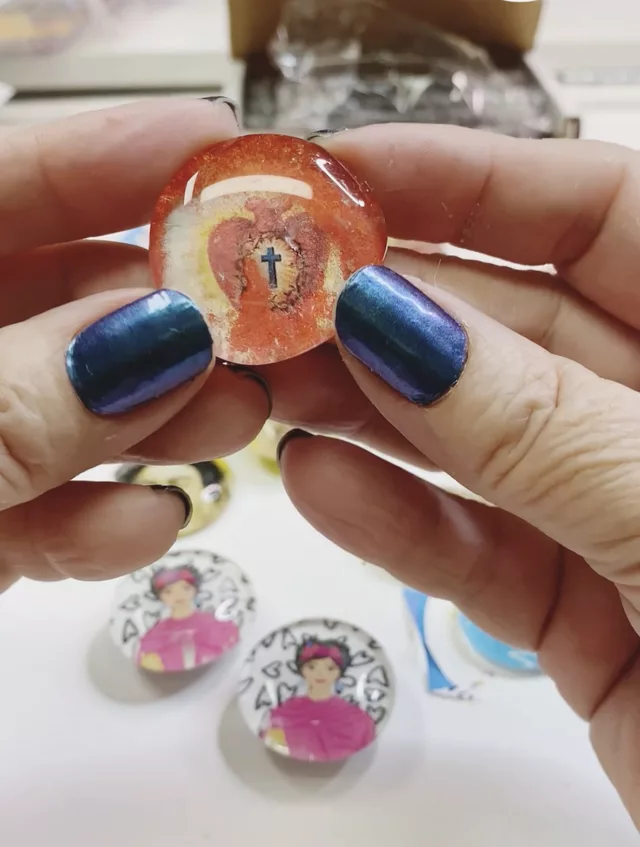
1. Flat glass marbles or round glass cabochons: These can be found at most craft stores or online. Make sure they have a flat back surface for easy adhesion. I like the jumbo size, they are a little over 1″.
2. Frida Kahlo images: Look for high-quality prints or images of Frida Kahlo’s artwork. You can find these in books, online, or even print them out yourself. You can also check Etsy. Print on high quality printer paper, it does not have to be laser prints. I don’t suggest heavy photo paper, it is too hard to glue and seal.

3. Mod Podge or Tacky Glue: This will be used to adhere the images to the glass marbles. I like Tacky glue because it is super thick and not watery. If it is too watery, it can mess up your image.
4. Small paintbrush or sponge brush: Use this to apply the Mod Podge or adhesive. Or…uhhh, I use my fingertips!
5. Magnets: You’ll need small magnets that are strong enough to hold the glass marbles on your fridge.
6. Scissors: These will be used to cut out the images.
7. Optional: Acrylic paint or markers: If you want to add some color to the back of the glass marbles, you can use acrylic paint or markers to create a background.
Now that you have your materials ready, let’s move on to the step-by-step guide on how to create your own DIY Frida Kahlo marble magnets.
Step-by-step guide to creating DIY Frida Kahlo marble magnets
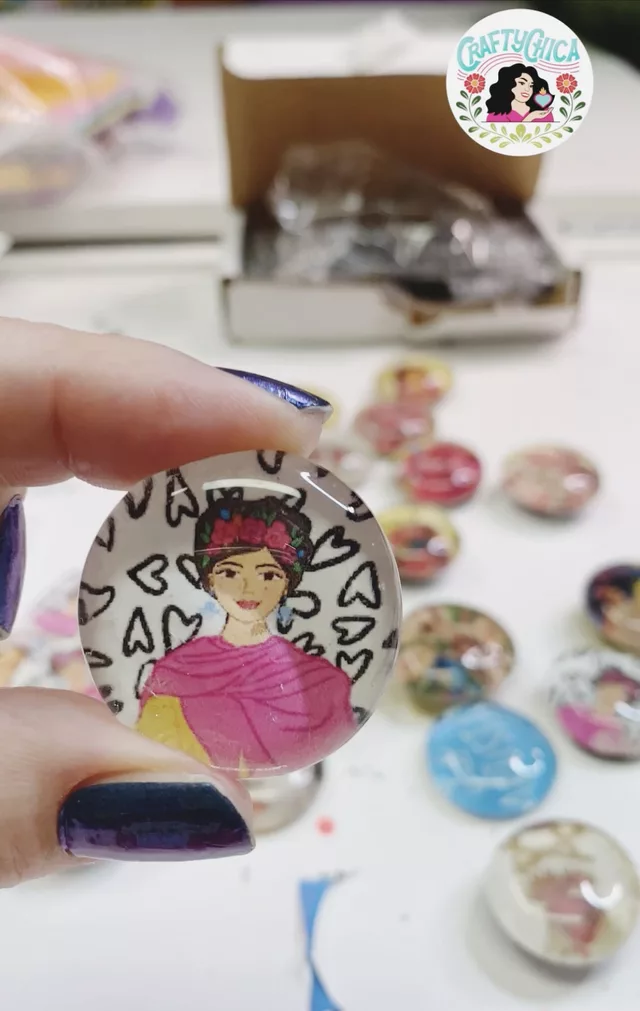
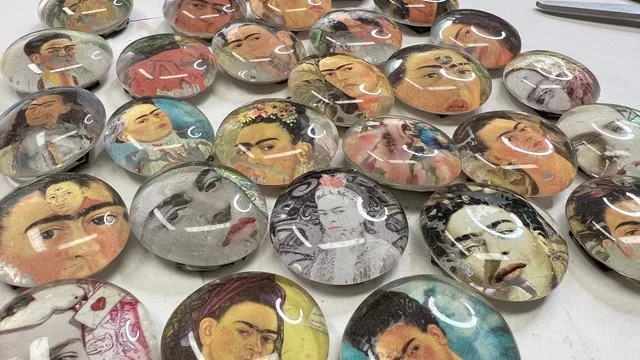
1. Start by selecting the Frida Kahlo images you want to use for your magnets. You can choose from her self-portraits, iconic quotes, or even images of her artwork. Print them out or cut them from a book or magazine. Make sure the images are sized to fit the glass marbles. You can even create mini-collages on the back of each marble. But apply in reverse order.
2. Once you have your images ready, place a glass marble on top of the image to determine the size you need to cut. Trace around the marble with a pencil and carefully cut out the image.
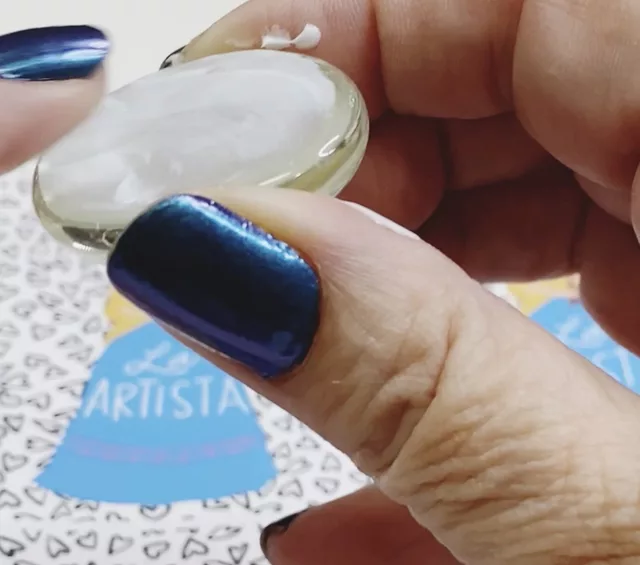
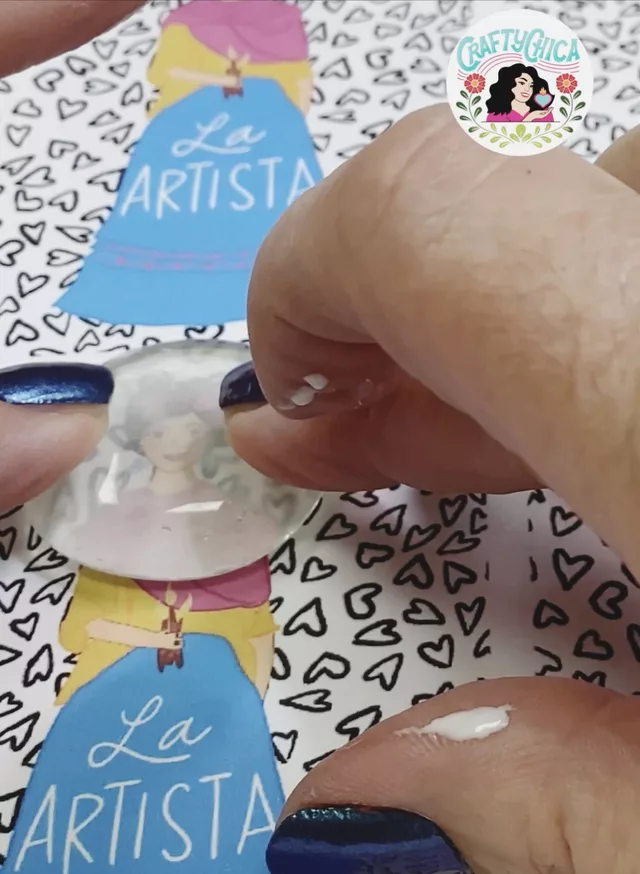
3. Apply a thin layer of Mod Podge or clear drying adhesive to the flat side of the glass marble using a small paintbrush or sponge brush. Make sure the entire surface is covered.
4. Carefully place the cut-out image onto the adhesive side of the glass marble, making sure it is centered. Gently press down to remove any air bubbles or wrinkles. Allow it to dry completely.
5. If desired, you can add a background color to the back of the glass marble. Use acrylic paint or markers to create a solid color or a simple design that complements the image on the front. Let it dry completely before moving on to the next step.
6. Once the adhesive and paint are dry, apply another thin layer of Mod Podge or clear drying adhesive on top of the image and background color. This will seal the image and create a glossy finish. Make sure to cover the entire surface of the glass marble. Let it dry completely.
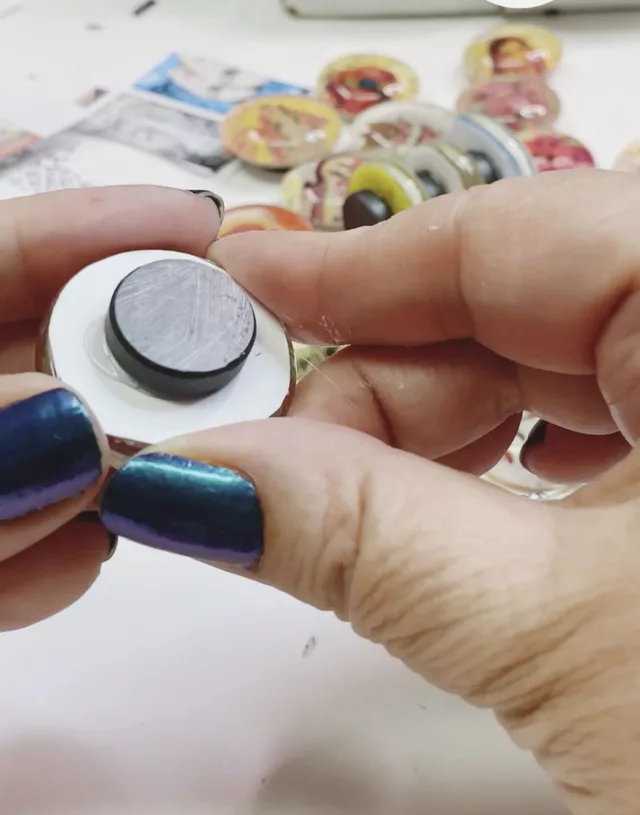
7. After the final layer of adhesive has dried, attach a small magnet to the back of the glass marble using a strong adhesive. Make sure the magnet is centered and securely attached. Allow it to dry completely before using.
Tips for making them look REALLY good
1. Use high-quality images: The quality of the image you choose will greatly impact the final result of your magnets. Look for clear, high-resolution images to ensure the details of Frida Kahlo’s artwork or face are preserved. The glass gem is already going to slightly distort the image, so start off strong.

2. Experiment with different backgrounds: While the glass marbles themselves are cool, you can add more texture with a background color or design. Decorate the image before you glue it.
3. Take your time with the adhesive: Applying a thinnnnn, even layer of Mod Podge or clear drying adhesive is crucial for achieving a professional-looking finish. Take your time and make sure to cover the entire surface of the glass marble, including the edges. All you need is a very thin coat, just enough to affix to the image.
4. Let each layer dry completely: Patience is key when working with adhesive. Allow each layer to dry completely before moving on to the next step. This will ensure that the image and background color are properly sealed and won’t smudge or peel over time.
5. Test the strength of the magnets: Before attaching the magnets to the back of the glass marbles, test their strength by placing them on your fridge or other metal surfaces. Make sure they can securely hold the marbles without sliding or falling off.

Ideas for your new DIY Frida Kahlo marble magnets
1. Fridge art gallery: Display your DIY Frida Kahlo marble magnets on your fridge to create a mini art gallery. Arrange them in a grid or scatter them around for a playful look. This will not only showcase your creativity but also add a vibrant and artistic touch to your kitchen!
2. Magnet board or metal surface: If you have a magnet board or other metal surface in your home, use it to display your Frida Kahlo magnets. This can be a great addition to an office space, bedroom, or any area where you want to add a pop of color and inspiration.
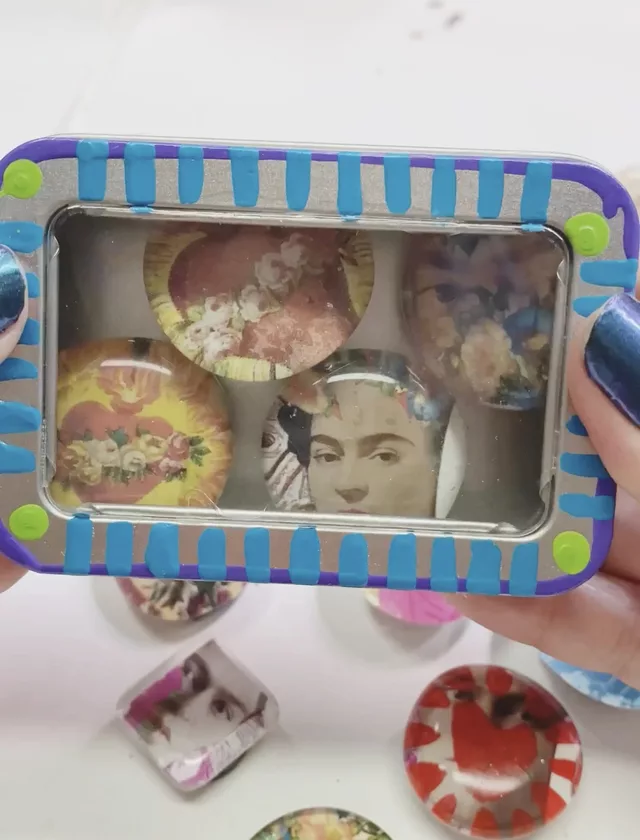
3. Gift for art lovers: These DIY Frida Kahlo marble magnets make a thoughtful and unique gift for art lovers or anyone who appreciates Frida Kahlo’s work. Package them in a cute box or tin and surprise your loved ones with a handcrafted piece of art.
4. Bookmarks or paperweights: If you prefer not to use the magnets on your fridge, you can repurpose them as bookmarks or paperweights. They will add a touch of elegance and creativity to your reading or work area.
Variations
While these look fabulous, here are ways to take them in a different direction:
1. Add or incorporate Frida’s quotes: Instead of using Frida Kahlo’s artwork, you can create magnets with her inspiring quotes. Choose powerful phrases that resonate with you and print them out in a font and style that complements the marble.
2. Mix and match: Create a set of Frida Kahlo marble magnets by using different images or quotes. Mix and match her self-portraits with images of her artwork to create a diverse and visually appealing collection.
3. Combine with other artists: If you’re a fan of other artists or want to create a more eclectic look, you can mix the Frida Kahlo marble magnets with magnets featuring other famous artists. This will create an art-inspired collage on your fridge or magnet board.
4. Experiment with different shapes: While the classic round glass marbles are widely used for this project, you can also try using other shapes like squares or ovals. This will add a unique twist to your magnets and allow for more creative compositions. You can find glass tiles that are square and oval!
Resources for finding Frida Kahlo artwork and images
NOTE: Do not use any artist’s images without their written permission. This project is for personal use only.
1. Art books and catalogs: Visit your local library or bookstore to find books dedicated to Frida Kahlo’s art. These books often contain high-resolution images of her paintings and self-portraits that you can use for your magnets for personal use or gift giving.
2. Online image databases: Websites like Getty Images, Wikimedia Commons, and Pinterest offer a wide range of Frida Kahlo images that are free to use for personal projects. Make sure to check the licensing requirements for each image before using them.
3. Online art marketplaces: Websites like Etsy and Society6 feature a variety of Frida Kahlo-inspired artwork, prints, and illustrations created by talented artists. These platforms are great for finding unique and original images to use for your magnets.
4. Museums and art galleries: Many museums and art galleries have online collections that feature Frida Kahlo’s artwork. Visit their websites or contact them directly to inquire about image usage for personal projects.
Burning questions about DIY Frida Kahlo marble magnets
Q: Can I use other types of adhesive instead of Mod Podge?
A: Yes, there are several alternatives to Mod Podge or Tacky Glue that you can use for this project. Make sure to choose an adhesive that dries clear and is suitable for glass and paper. I would not recommend cheap craft glue, it is too watery and will make the paper buckle.
Q: How do I make sure the magnets stay securely attached to the glass marbles?
A: To ensure the magnets stay securely attached, use a strong adhesive like E6000 (will make your image look wet until the glue dries, it takes forever!) or a hot glue gun (my choice). Apply the adhesive to the back of the magnet and press it firmly onto the glass marble. Allow it to dry completely before using.
Q: Can I make these magnets with other artists’ images?
A: Absolutely! While Frida Kahlo is a popular choice for this project, you can use images of other artists or even your own artwork. The process remains the same, and it’s a great way to pay homage to your favorite artists or create a personalized set of magnets. For personal use only, though.
Q: Can I make larger versions of these magnets?
A: Yes, you can definitely experiment with different sizes of glass marbles or cabochons to create larger magnets. Just make sure to adjust the size of the images accordingly and use stronger magnets to support the weight.
Q: How do I clean the magnets if they get dirty?
A: To clean the magnets, simply wipe them gently with a slightly damp cloth or sponge. Avoid using harsh chemicals or abrasive materials, as they can damage the image or the adhesive.
Thanks for checking out my craft – I hope you try it and like it. It is a longtime fave of mine. i’ve been making marble magnets for years!


This DIY Frida Kahlo marble magnet project is gorgeous! It’s a great way to add creativity and art to commonplace items. Anyone interested in testing it out can do so thanks to the clear and simple to follow step-by-step instructions that are supplied. I appreciate the advice, particularly the insistence on selecting high-quality photos and taking my time applying the adhesive. These magnets honour Frida Kahlo’s vivid energy and artistic legacy while giving any fridge a unique touch. A great craft concept!